Load testing - A step by step guide using "Bearer Token" Authorization
Step 1 : Recording the script via Blazemeter™
Blazemeter will be used as the recording tool to record the user navigation across the pages of the web application which is subject to be load tested.
Blazemeter will be used as the recording tool to record the user navigation across the pages of the web application which is subject to be load tested.
- Install the Blazemeter extention to google chrome browser.
- Record the scenario which needs to be load tested using Blazemeter (Recording widget)

Note : Make sure you are logged in to blazemeter in order to enable the save options.

- Select the option "JMeter only" as the script type to be saved.
- Select all the available domains to be included in the recorded JMeter script and click save to export as .jmx
- After downloading the .jmx file move it inside the intended load test project folder.
Step 2 : Optimizing the recorded script via Apache JMeter™
- Go to path where Jmeter is installed : cd /Users/nipun/tools/apache-jmeter-5.0/bin
- Open Apache Jmeter by running the command : sh jmeter
- Open the recorded .jmx file in jmeter.
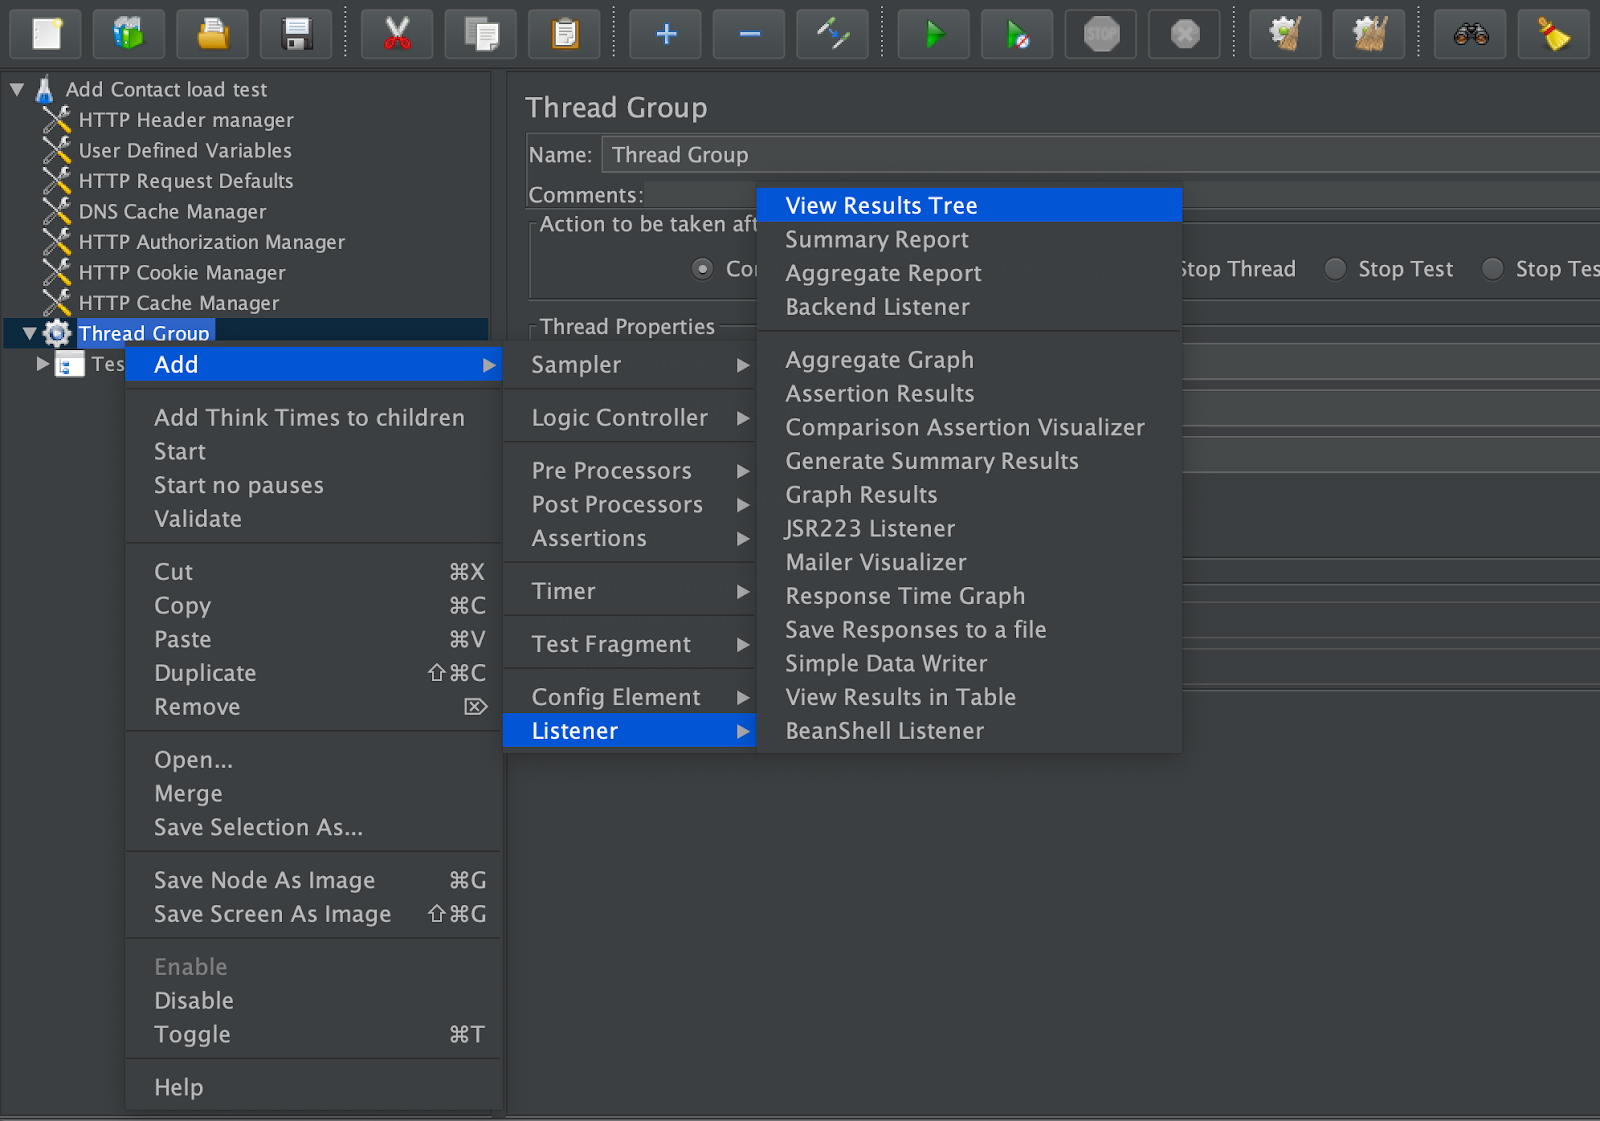
- Select the thread group node and add a View Results Tree Listener (Add->Listener->View Results Tree)
- Run the batch of https requests by clicking on the start button and select the View Results Tree node to view the progress on execution of requests until the intended functionality to be load tested is complete.
- Here you will find some https requests failing when running them for the first time. This is normal and you can simply remove any unwanted failing requests from the tree using “remove” option
- After running and identifying the entire set of https requests, you can delete any unwanted requests which are being sent to the servers.
Step 3 : Knowing your Request / Response headers while identifying tokens and Authorization type
An access token and refresh token is provided by web applications in order to maintain the secured access throughout the session for the logged in users. Each logged in user obtains a unique access token and refresh token. Both these tokens expire periodically (eg: every 1 hour) in order to prevent unauthorised access.

Access Token : An Access Token is a credential that can be used by an application to access an API. Access Tokens can be either an opaque string or a JSON web token. They inform the API that the bearer of the token has been authorized to access the API and perform specific actions specified by the scope that has been granted
Refresh Token : A Refresh Token is a special kind of token that can be used to obtain a renewed access token —that allows accessing a protected resource— at any time. You can request new access tokens until the refresh token is expired.
In order to obtain these 2 tokens user should send 2 parameters called client_id and client_secret along with username and password in the login request. These 2 tokens are created by the authorization server and provided for the client(user) in the login response.

- Locate the POST https request (normally the first POST request) in results tree which performs the login functionality and examine the values returned in the https response body for the keys: access_token and refresh_token.

- Then examine the request header of all the https requests which comes after the login request and notice the inclusion of access token in each and every https request header
This Access token is used throughout the entire batch of https requests and it is passed in the https request header under the name Authorization. The word Bearer is used before the access token in order to distinguish the authorization type Bearer from other authorization types such as Basic or Digest.
Step 4 : Extracting the access token using Regular Expressions.

- Select the authentication request which contains the access token in it’s response body.
- Right click and add a Regular Expressions Extractor. (Add->Post Processors->Regular Expressions Extractor)

- Specify the following parameters as described.⊳ Field to check: This should be selected as Body since we are extracting the token from the body of the response ⊳ Variable Name: Give a suitable name (which makes sense) for the regular expression variable. ⊳ Regular Expression: Define the regular expression along with it's leading text (eg:“access token”) which can be used as a position marker when locating the token string inside the response. For this scenario we will specify it as"access_token":"(.+?)" ⊳ Template: Template parameter is useful when dealing with multiple regular expression variables. Since our requirement is to extract only one string we will specify it as $1$ ⊳ Match Number: Specify which result (out of the matching result set) to be considered when extracting the token
Step 5 : Setting the access tokens using regular expression variable.
In order to replace this static token with the regular expression variable which we created in the previous step following steps need to be followed.
- Select the request which follows the token generation request.
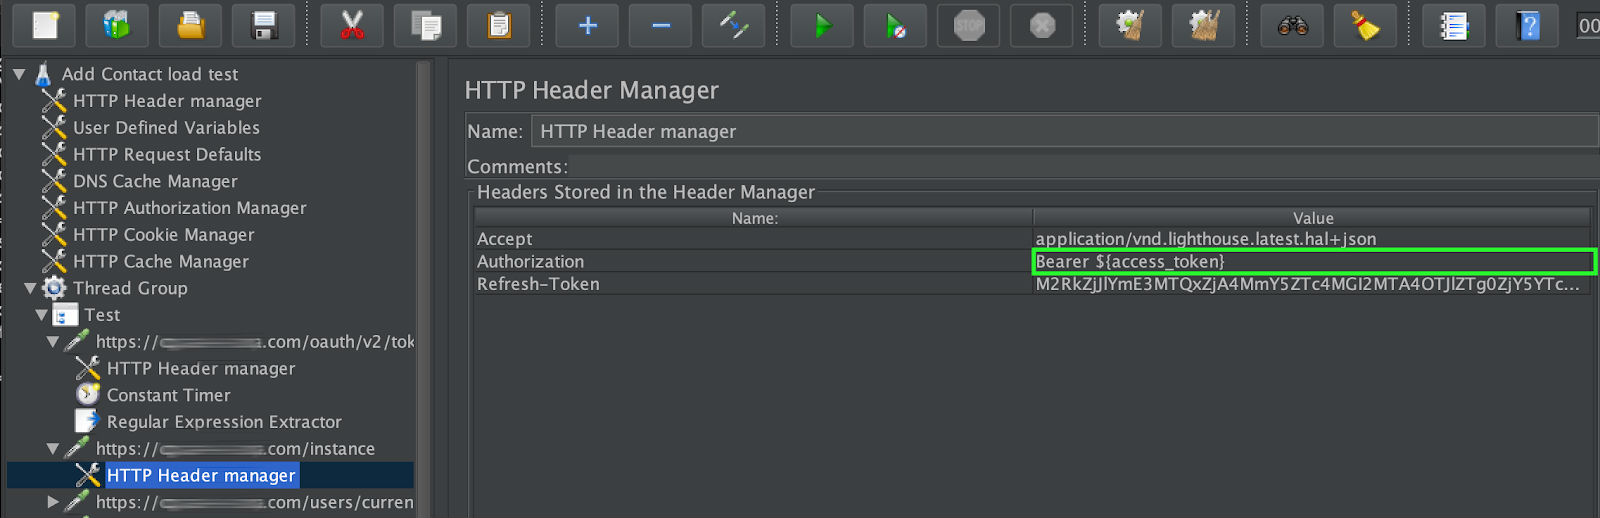
- Expand the request and select the HTTP Header manager.
- Locate the Authorization header under the headers list of the HTTP Header manager
- Replace the trailing alphanumeric value of the Authorization parameter (which follows the “Bearer” word) with the regular expression variable which we created in the previous step.
- Specify the Authorization value inside curly brackets as ${access_token}
Step 6 : Fine tuning the script before the load test.
- There can be (Of course there are) unnecessary requests which are being recorded in your script. Make sure to remove any unwanted requests which are not required to be sent during the focused scenario of load test.
- Replace the Authorization token value with regular expression variable for remaining requests which are required for the load test. Of course you can use find and replace functionality of a notepad editor to get this done with less time.
- Make sure the regular expression variable is being set properly inside the authorization header value of all the requests. Failing to do this accurately will result the entire set of requests to fail.
- Execute the script in Jmeter again and observe the results in the View Results Tree node.
- If everything went well the results tree will notify that the Test is Pass with a green icon at the final step. Make sure to save the .jmx file after doing the required fine tuning to the script.

Step 7 : Setting up the test automation framework - Taurus
In order to execute our recorded .jmx script we need a test automation framework which caters to the requirements demanded by load test execution. Taurus is an open source test automation framework, providing simple YAML-based configuration format with Domain Specific Language, where tests scripts can be executed through command-line.
- Since we are using Mac OS we can use brew package manager to Install Taurus. (You can find out the installation steps for other operating systems as well in the Taurus official user manual.)
- Execute following command in Terminal to install Taurus. brew install bzt
- And execute following command in Terminal to upgrade Taurus. brew upgrade bzt
Step 8 : Configuring the load test via YML
Now that we have our test automation framework - Taurus installed it is time to set load test scenario details using parameters such as ramp-up time, ramp-down time, time to hold the load, concurrency, etc. A .yml file will be used to store the configuration parameters of the load test.
- Open PhpStorm and create a new project for the load test.
- Add the .jmx file to the project folder.
- Create a .yml file inside the same folder where the .jmx file resides
- Specify the load test configuration parameters as below using YAML.
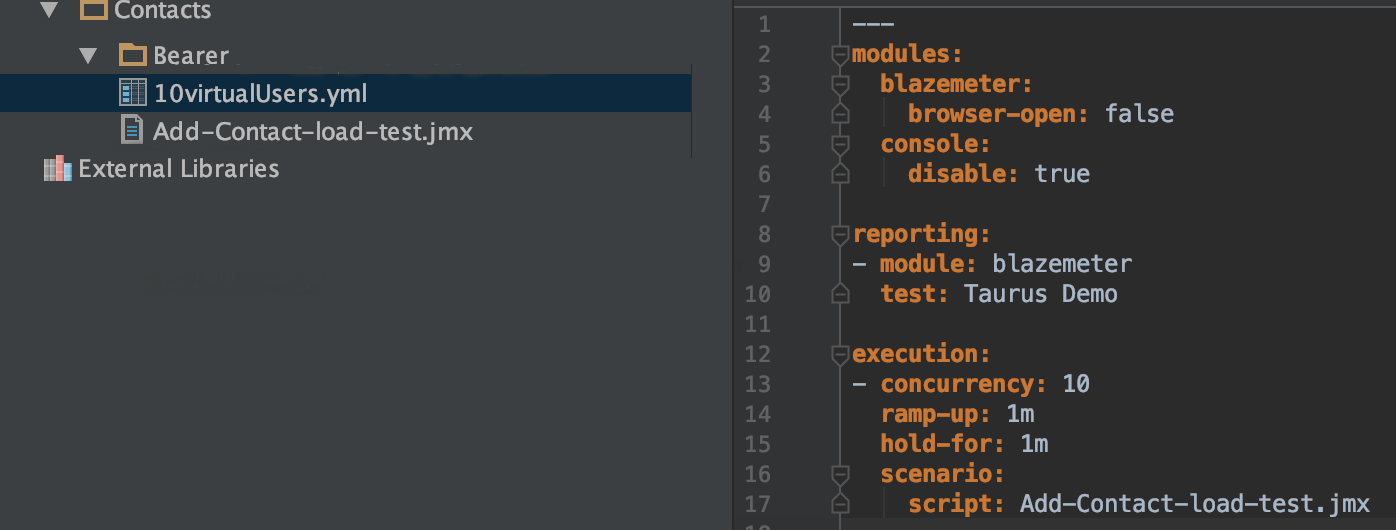
Parameters can be described as below.
⊳ Concurrency : Denotes the number of virtual users.
⊳ Ramp-up : Refers to the ramp up time to reach the maximum number of virtual users (specified in minutes)
⊳ Hold-for : Refers to the hold up time after reach the maximum number of virtual users (specified in minutes)
⊳ Script : This should be the name of the jmx file with the .jmx extension
Step 9 : Executing the load test via terminal
Finally we are all set to execute the load test. We have the .jmx file and .yml configuration file.
- Open a Terminal window and navigate to the created load test project folder
- command below. bzt 10virtualUsers.yml
When executing the test for the first time it will install some relevant packages and could take up to 2 minutes. After the execution gets initiated successfully following kind of output can be observed in the terminal
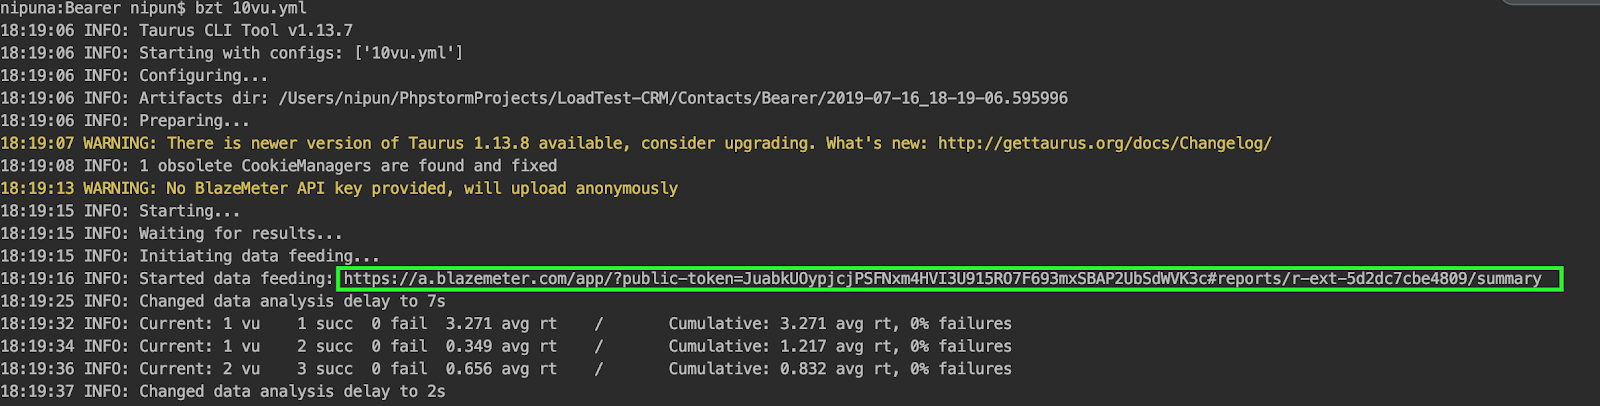
A Blazemeter URL will be provided in the console output (as highlighted in the image above) which will enable the Test Engineer to view the real time progress of the load test.
Open the provided URL in the web browser and you will be navigated into the real time report of load test execution.
Open the provided URL in the web browser and you will be navigated into the real time report of load test execution.

Bravo .... Nipuna well done
ReplyDeleteThanks alot Muaaz..!!
Delete